I added a prop tunnel to jigsaw to minimize draft and give added protection to the Propeller , but the practicality of creating the tunnel in complex compound curves out of sheet plywood while possible , is not easy . Therefore I cheated ! . The basic cutout in the hull is formed by flat layers of sheet plywood in a basic shape , thus creating the structural base of the entity , the final shape will be created later out of fiberglass and foam , much easier in this medium . I used a similar technique on the conical bow sections but that was a single curve where this is a compound ( 2 directions ) curve therefore more flexibility was required.
As you can see we also have a much curvier hull shape compared to the earlier 2 sections , as the hull lines make their way back up to the stern ,nice to see as straight lines are so boring.
This is only the first skin layer , still another to add , the second skin covers the edge of the first so as to increase strength and minimize the exposed edge of the ply , still its all covered with layers of fiberglass later anyway .
In the first picture you can just make out a bolt emanating from the front of this section , this is the keel height as taken from the previous section , by the time it reaches the tunnel and propeller position it will be almost 800 mm from the base of the tunnel , not inconsiderable .
I had toyed with the idea of a propeller strut instead of a full keel but stuck with it as it gives more protection and at the design cruising speed of 6 knots shouldn't affect the propeller efficiency too much .
Tuesday, 27 January 2015
Monday, 19 January 2015
HouseBoat or Boat Boat
Have been fine tuning the overall look of jigsaw , and made some changes to the upper structure design . Have edged the design away from it being just a Houseboat to more of a conventional boat in the overall look .
Propulsion system is also changed , is now a hybrid of solar , battery , diesel and electric motors .
Sounds complex but due to the large solar arrays on the top of the boat it should make for more economical operation .
Am currently working on the prop tunnel in the last section of the first hull ( pictures soon ) .
Interior layout has also changed , large workshop at the rear is now replaced with an open deck , a smaller workshop has been placed into the port hull under the Dining area . Side Decks now surround the entire lower portion . My own little ( relatively ) Mini Superyacht !
Sunday, 2 November 2014
Section 3 , Ready for the daylight
Section 3 is ready to see the light of day , actually has been for 3 weeks but i needed to get myself re-organised with sections 1 and 2 so i had the available space .
Moved Section 1 round the back yard and created some stands to keep it upright .
This free'd up the rotate jig so this was moved back round the front and inserted over hull section 2 , bolted it up and rotated it back to a more normal orientation . This came with a bit of drama as we had an issue with the braking line , the weight came on too fast and my daughter wasn't able to hold the hull so the first 90 degree's happened in 10 minutes and the second in 3 seconds ( OUCH ) .
Boat ended up with a cracked frame and a daughter with rope burns on her hands ( More OUCH ) .
( sorry , no pictures , was far too stressed ) .
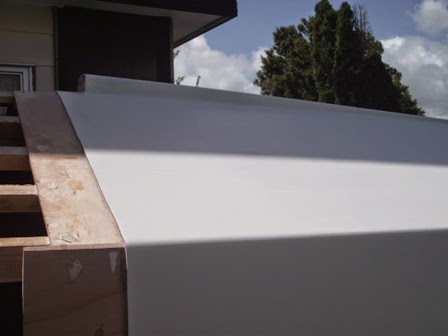
Time to move section 3
Out it comes into the daylight .
Fully out now , time to do a bit of a tidy up , still have to remove the " Frames +1 " and clean up
the unpainted surfaces . The additional frame can be seen at the back of the hull section , its actually the first frame of the next stern section , we continue the Longitudinal stingers to this additional frame so the hull sections will be fair when they are joined . We cut it off now as its required to build the next section .
The keel runs flat from the mid-section of the boat so as you can see here ,it starts to protrude more as the hull curves back up towards the stern .
Originally i had set a timetable of 4 months for each hull section and 6 months for the bow , its taken more than this for the first 2 pieces , but at last we are getting closer to schedule , excluding the hull re-organisation , this section was basically done in the allotted time frame .
Have removed the "frames+1" and tidied up the exposed surfaces , will store this piece here until we are ready to frame up the stern section , when that happens we reposition this section back in front of the garage and connect up the two sets of frames to ensure a nice fair hull .
Back to building more frames now , stern section is slightly different as has 2 structual bulkheads , frame 17 is the separation between section 3 and the engine room and frame 20 is essentially the stern of the boat , there is also a frame 21 , but that is much smaller and is part of the step down stern platform . Need to order some more timber ( wallet opening time , OUCH )
Sunday, 25 May 2014
Oh No ! Not Again !!
Time to remove Section 2 from the Garage , Need to make room to start on the next Piece of the puzzle !
Something seems familiar about this issue ??
Luckily this section isn't as tall as the first so I was able to lower it ( get down to the ground ) to enable for it to be removed successfully .
Time to start building the next set of Frames , one Bulkhead and four open timber frames .
Something seems familiar about this issue ??
Luckily this section isn't as tall as the first so I was able to lower it ( get down to the ground ) to enable for it to be removed successfully .
Time to start building the next set of Frames , one Bulkhead and four open timber frames .
Saturday, 3 May 2014
Roll me Over , Roll me Over
Roll Me over and Do it again !
With Hull Section 2 complete I need to get Section 1 out of the way , this involves moving and rolling it over . To do this I have Built a Stonger Boat Cradle than would normally be required and to go with it , two semi - circular steel additions . Here's my boy Matthew helping by cleaning up the welds .
Next job was to roll it over , now where's that boat gone , must be around here somewhere ?
Moved the Hull Section 1 into the upside down cradle and started the turning process .
Bit by bit and Slowely it rolls over
So thats what it looks like from underneath , havn't seen that side of it before !
Half Way now , if anything goes wrong with this I will not be Happy !
The Inside ( or under side ) , or What ever you want to call it
Now we are on the Downward slope , glad its a Big Strong Chain ! .
While I'm on the Chain My Daughter Sam is on the Safety lines , thanks Sam
Phew , Finally over and as the Sun sets I can finally Relax
Just enough light to do a Titanic ( I'm Flying ) on the Bow ( Kids !! )
Monday, 10 March 2014
Joy Oh ! Joy , Yeah Right
Skinning of section 2 is now complete , so on with the Fairing and Sanding ( Joy Oh Joy - NOT ! ) .
Must remember to make a detailed log of the next sections build , must analyze times for each operation and determine why build is taking longer than expected . Need to progress Faster ! , or at least understand the delay's .
As can be seen in the picture , not much Curve in this section , just a nice gentle change in pitch as we progress down the hull . If I can get the sanding complete this week , we might just start the fiber-glassing on the weekend . Glassing is a real pain when there's only one person doing the job , wonder if I can bribe the kids into helping .
The frame shown is the last of the Tank frames ( frame 6) , 900 mm behind this is Bulkhead #2 ( frame 7 ) and behind that is 3 open timber frames ( 8 thru 10 ) . Each hull has 21 frames each so we still have a way to go . Better break out the caffeine .
Monday, 3 February 2014
Houston , We have separation !!
We have run into some delays , some expected and some not . Part of the process i guess , never thought it was going to be easy .
Over the Christmas Period we started on the tricky Join Section between Section 1 and Section 2 , Second section was created and formed from the first so as to create a smooth transition . The Interior Scarfed frames were created and screwed together to hold everything in position and then the exterior plywood added to stabilize the join . Now comes the Nasty bit !
Removed the internal scarfed joiner pieces from the inside and using my Trusty Skillsaw
we cut the plywood and separated the two Hull Sections .
Having continued skinning Hull Section 2 we have also made a start on the Cradle and the turning frame . With 8 pieces to rotate it made sense to build my own System to turn the hull sections over . This will consist of a semi-circular turning frame attached to the side of the Steel cradle . Both are made from some Heavy gauge angle steel cut and welded into shape .
Again my equipment is failing , just got the steel cut and bent into shape when I started the Welder to join the sections an arcing noise was heard , not at the welding rod where i expected it to be but from inside the welder itself . DAMN ! .
This is the Turning Section before Welding ( attempted ) , but after another weeks delay I have managed to get the Welder Functional again and this section is now Fully Welded and awaiting the creation of the steel cradle to which it will be fitted .
Subscribe to:
Posts (Atom)


